How to make basic leather rolled handbag handles
Surprisingly, before now I had never before made a rolled/corded bag handle. Why that is, I have absolutely no idea! With goals of trying all the leather bag techniques I can, I dove right into making a tote and patterning out my handles. 
The first thing I needed to do was to make the end shapes. Since I was looking to to a classic “leaf” shaped end, I tried making the shape and then needed to see where and how many stitching holes were needed. With a starting hole on the end point, I went up each side with the same number of holes, ending at where my stitching line would be for the handle curve (middle section).
To test out my pattern template, I traced and cut an end section and also cut a piece of leather cording and glued it down on the back in the center. After the cording was mostly set, I tapered (skived) down the cording gradually down the end of the “leaf” ending at the point.
Next was to stitch the handle curve and then press the “leaf” down to a sheet of paper, trace shape and mark holes in order to make the template for the handle placement on the bag.
When those two templates were good, I tested and retested on leather scrap until I was satisfied! These samples are great too for testing to see where you want the handle placement to be on your bag. Make sure to create handle attachment point placements on pieces of bag before bag assembly! With the bag I made, this isn't life or death if you don't, but this bag doesn't have lining. So it's always easier to make handle attachment stitching holes beforehand.
Here you can see my 1st, 2nd and 3rd attempt at a good pattern/template.
Once I liked my template I cut out my two leather pieces for my two handles and make my stitching holes ( also attachment points on bag pieces too). Then I took my 1/4” leather cording and glued them to the middle of the handles. After skiving the ends to a taper, I gled the middle section together and stitched. After the middle section was all stitched I trimmed the seam allowance. The final thing was stitching the handle ends to the bag! 
Two handles cut to the length needed.
(ignore the brown pieces! :) this is a different bag I made with handles)
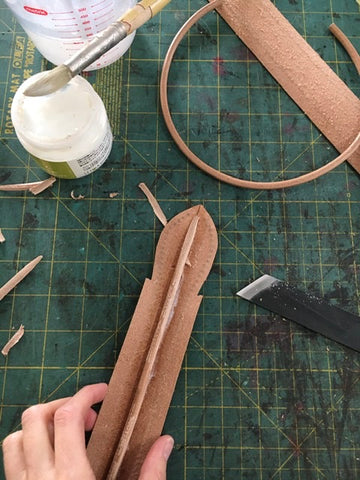
Glued down leather cording to middle, tapered at ends. At this stage, it’s good to back the cording ends with another piece of leather to keep ends secure inside the leaf.

Glue middle section together so you can stitch this section first.

After stitching the middle section and before trimming.

After stitching, trim excess leather to match up with handle ends.

Stitch handle ends to bag. Make sure you stitch from top to the bottom on each side of each end, this adds strength to your handles!
I hope this helped you figure out how to design and make you own handles! There are an infinite number of ways to make a handle, so once you get the basics you can imagine and make anything!
Let me know in the comments if you have any questions and make sure to let me know how your projects go!
-Britta
Want to learn more? Click on this link to head on over to my next post!
https://brittakeenan.com/blogs/news/gusset-love
To purchase a Liten tote bag, click below!
https://brittakeenan.com/products/liten-tote-bag
Very informative good job
Thanks for posting it
Hola!!consulta:que grosor de cuero?de interior de la tira??? Gracias!
Hi Britta! I have one question. Which kind of knife do you use for cutting leather? I search for such a long time and still I am not very satisfied with those many knives I have now. Thank you! Kind regards, Theres
Hi, do you sell templates for rolledhandles, how can I buy it?
Kind regards,
Hallo Britta, deine Anleitung hat mir sehr geholfen. Da ich keine Lederschnur in dieser Breite habe werde ich den Versuch mit einer dicken Kordel machen. Freue mich schon darauf, den die Henkel sehen sehr professionell aus!!!!